Learn about the erosion process and identify an example of where erosion occurs. Determine where the eroded material ends up and how erosion can be minimized.
Soil Erosion
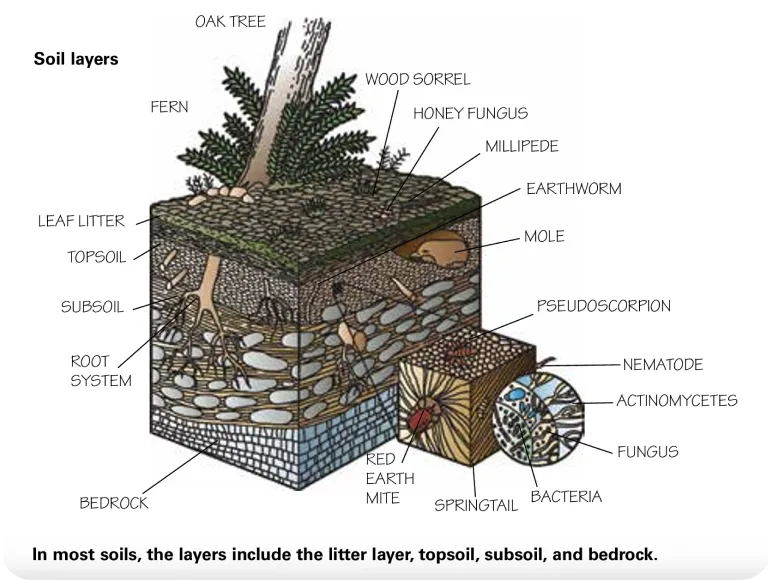
Soil erosion is a natural process caused by wind, water, and ice, but human activities like farming, logging, mining, construction, overgrazing, and burning forests can speed it up. The top layers of soil (litter and topsoil) help prevent erosion because plant roots hold the soil together and air spaces absorb water. When these protective layers are removed, the soil beneath is often less fertile and struggles to retain water. Today, soil is eroding faster than it forms on about one-third of Earth’s croplands, making soil conservation essential to maintain fertile land for plants and crops.
Although rock is not technically “soil,” over large regions and geological time scales, erosion carves canyons through rock and erodes mountain chains. The Grand Canyon is over a mile deep, and the Appalachian Mountains used to be several times higher—likely reaching the towering heights of the modern Himalayas before hundreds of millions of years of wind and water wore them down.
Where Does Soil Erosion Occur?
Soil erosion happens in places where the top layer of soil is worn away by wind, water, or human activity. It can occur on farmland, where plowing and planting remove natural plant cover; on hills and riverbanks, where rain and flowing water wash soil downhill; and in construction sites or bare patches of land, where plants are removed and the soil is exposed. In summary, soil erosion can happen anywhere the soil isn’t protected by plants, grass, or other cover, and it can make it harder for new plants to grow and for animals to live in the area.
Signs of Erosion
Signs of erosion and land degradation include the following:
Mud and silt on sidewalks and driveways after a rain
Exposed tree roots where the soil has been washed away
Roadside ditches filled with sediment
Muddy water in a stream or river
Caved-in streambanks
Did You Know:
During the 1930s
Dust Bowl
, farms in Oklahoma, Kansas, and Texas lost topsoil due to drought, strong winds, and removed grasses, making it hard to grow crops and forcing many families to leave.
Minimizing Soil Erosion
Farmers use a range of soil conservation methods to reduce erosion and protect their land. Instead of leaving fields bare after plowing, many now keep soil covered with plants or crop residue, which helps protect it from wind and rain. Practices such as no-till farming reduce soil disturbance, improve water retention, and lower the need for fertilizers and pesticides.
In areas with steep slopes, terracing creates level steps that slow water flow and prevent soil from washing away. On gentler slopes, contour farming and strip-cropping place crops across the slope and in alternating strips to reduce runoff. Soil erosion is also reduced by protecting stream banks with plants or rocks and by using careful forest management practices that maintain plant cover, support wildlife, and keep soil in place.
These methods help keep soil in place, protect water quality, and maintain healthy ecosystems.
Use the procedure outlined below to plan how to fulfill this requirement.
Procedure
Step 1
Get permission before you dig up any soil for this experiment.
Step 2
Place cut-up strips of newspaper into a bucket and fill the bucket with water. Stir occasionally. Leave the newspaper in the water until it falls apart and becomes a mushy mix of paper and water. This may take a few days.
Step 3
Build three long, narrow boxes out of wood, shoe boxes, or plastic or metal pipe. If you use cardboard, line the boxes with plastic bags or foil and cover any seams with adhesive or duct tape to prevent leaking.
Step 4
At one end of each box, cut a large V-shaped notch about half as deep as the end wall of the box. Label the boxes “1,” “2,” and “3.”
Step 5
Fill boxes 1 and 2 with garden soil so that the surface of the soil is about half an inch below the top edges of the boxes.
Step 6
Fill box 3 with soil that has grass growing on it. Make the soil surface about half an inch below the top edge of the box.
Step 7
Drain off the water from the newspaper mix. Take a handful of the mush, squeeze out more water, and spread this on top of the soil in box 2. Continue to do this until the surface of the soil in box 2 is covered with the newspaper mixture. Let it sit overnight.
Step 8
The following day, line up the three boxes in a row. Place a brick, large rock, or book under the uncut end of each box. Place a collecting pan, jar, or cup under the lower end of each box below the cutout V. Photograph or make a drawing of each box.
Step 9
Fill the watering can with a measured amount of tap water. Standing at the higher end of box 1, sprinkle the water on the soil surface until the can is empty. Wait about three minutes until the water stops running from the V notch, and then observe the water that collects in the pan, jar, or cup. Measure the amount of water and note its color. Record the data in your notebook.
Step 10
Repeat step 9 for boxes 2 and 3, using the same amount of water each time. Photograph or make a drawing of each box to show the changes.
Observations
Describe the differences in the path the water took in each of the three boxes.
How much water ended up in each collecting pan after three minutes? What was the color of the water in each collecting pan?
How did the color and the amount of water differ in each collecting pan after three minutes?
How much soil ended up in each collecting pan?
The newspaper mixture used in box 2 resembles a mixture sprayed on bare soil at construction sites to prevent erosion. Based on your experiment, why do you think this is a good idea?
Conclusion
Using your experimental data and photographs (or drawings), show your results on a poster. Present your poster to your counselor.
Now that you have learned about erosion,
let’s investigate a land pollution incident listed in the Environmental Protection Agency Superfund Priority List.